


How to Track ChatGPT Ad Conversions,
ROI & Phone Leads
Install the OpenAI Measurement Pixel, fire conversion events, track phone calls, and pass data to GA4 — complete technical guide.
Running ads on ChatGPT without conversion tracking is like driving with your eyes closed — you're spending money, but you have no idea what's actually working.
OpenAI's Ads Manager includes a Measurement Pixel — a lightweight browser-side JavaScript SDK that reports back every time someone who clicked your ChatGPT ad takes a valuable action on your website: submitting a form, completing a purchase, registering, scheduling an appointment, or calling your phone number.
This guide covers the full technical setup for digital marketers — from creating your pixel in Ads Manager, to installing it via Google Tag Manager or WordPress, to wiring up the specific events that matter most for lead generation, phone calls, and ROI measurement. We also cover how to pass ChatGPT conversion data into GA4 for unified cross-channel reporting.
You should already have a ChatGPT Ads campaign set up in Ads Manager (ads.openai.com). If not, read our guide How to Advertise on ChatGPT first before continuing here.
Create a Conversion Source in Ads Manager

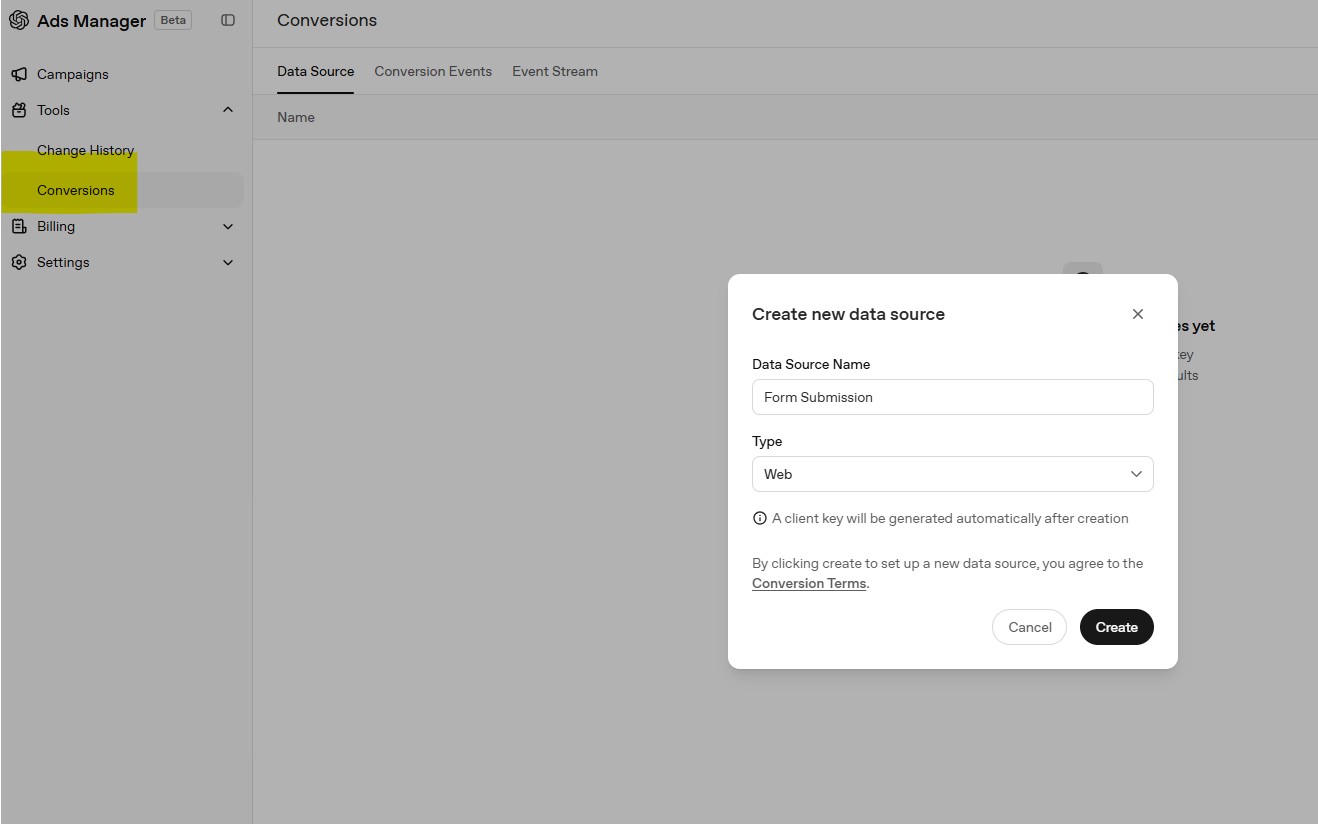
Inside Ads Manager (ads.openai.com), click Tools in the left sidebar, then select Conversions. This is where all your measurement sources and pixels are managed.
Click "Create a new source" and when prompted for the type, select Web. OpenAI will generate your unique Pixel ID — a string you'll embed in all your tracking code.

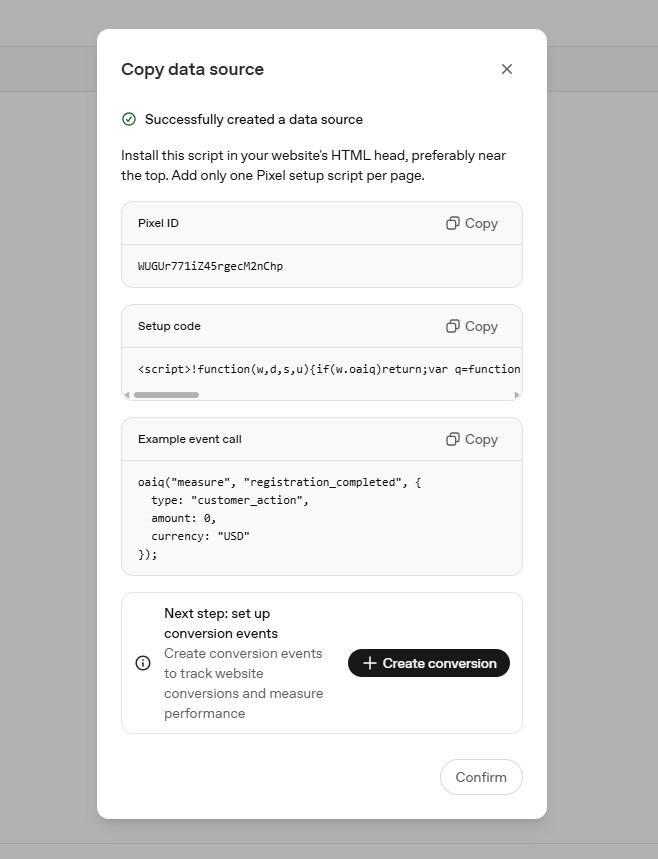
Copy your Pixel ID immediately after it's created and store it somewhere accessible. You'll need it in every snippet you install. It's a unique alphanumeric string specific to your account.
Install the OpenAI Measurement Pixel
The Measurement Pixel loads asynchronously and initialises a global oaiq() function used to fire all conversion events. Add the following snippet to the <head> section of every page on your website — near the top so early conversions aren't missed.
<!-- OpenAI ChatGPT Measurement Pixel -->
<script>
  (function (w, d, s, u) {
    if (w.oaiq) return;
    var q = function () { q.q.push(arguments); };
    q.q = [];
    w.oaiq = q;
    var js = d.createElement(s);
    js.async = true;
    js.src = u;
    var f = d.getElementsByTagName(s)[0];
    f.parentNode.insertBefore(js, f);
  })(window, document, "script", "https://bzrcdn.openai.com/sdk/oaiq.min.js");

  oaiq("init", {
    pixelId: "<YOUR-PIXEL-ID>",
    // debug: true  ← enable during testing only
  });
</script>Add debug: true to the init options while setting up. This logs every pixel event to your browser console (F12 → Console) so you can confirm events are firing before going live. Remove it for production.
Add the Pixel via Google Tag Manager

Google Tag Manager is the recommended installation method — it's cleaner, easier to update, and doesn't require editing theme files. Here's how:
- In GTM, go to Tags → New
- Click Tag Configuration → choose Custom HTML
- Paste the full base pixel code from Step 2 (including the
<script>tags) - Under Triggering, select All Pages
- Name the tag (e.g. ChatGPT Pixel — Base) and click Save
- Create a second Custom HTML tag for each conversion event, triggered by the appropriate page URL or GTM event
- Publish your GTM container
GTM's Custom HTML field expects full HTML. Always wrap your pixel code and conversion event calls inside <script></script> tags — unlike a .js file where you'd write raw JavaScript.
<script>
  // Fires when user reaches the thank-you page after form submit
  oaiq("measure", "lead_created", {
    type: "customer_action"
  });
</script>WordPress Installation (header.php)


If you're managing your own WordPress theme (or a child theme), add the pixel directly to header.php:
- In WordPress admin, go to Appearance → Theme File Editor
- Select header.php from the file list on the right
- Find the closing
</head>tag and paste the full base pixel code immediately before it - Click Update File
Never edit your parent theme's header.php directly — a theme update will erase your changes. Use a child theme, or a plugin like WPCode or Insert Headers and Footers to safely inject the snippet without touching theme files.
For the conversion event on your thank-you page, use a per-page script injection plugin, or use GTM as described in Step 3 — either approach keeps your tracking clean and maintainable.
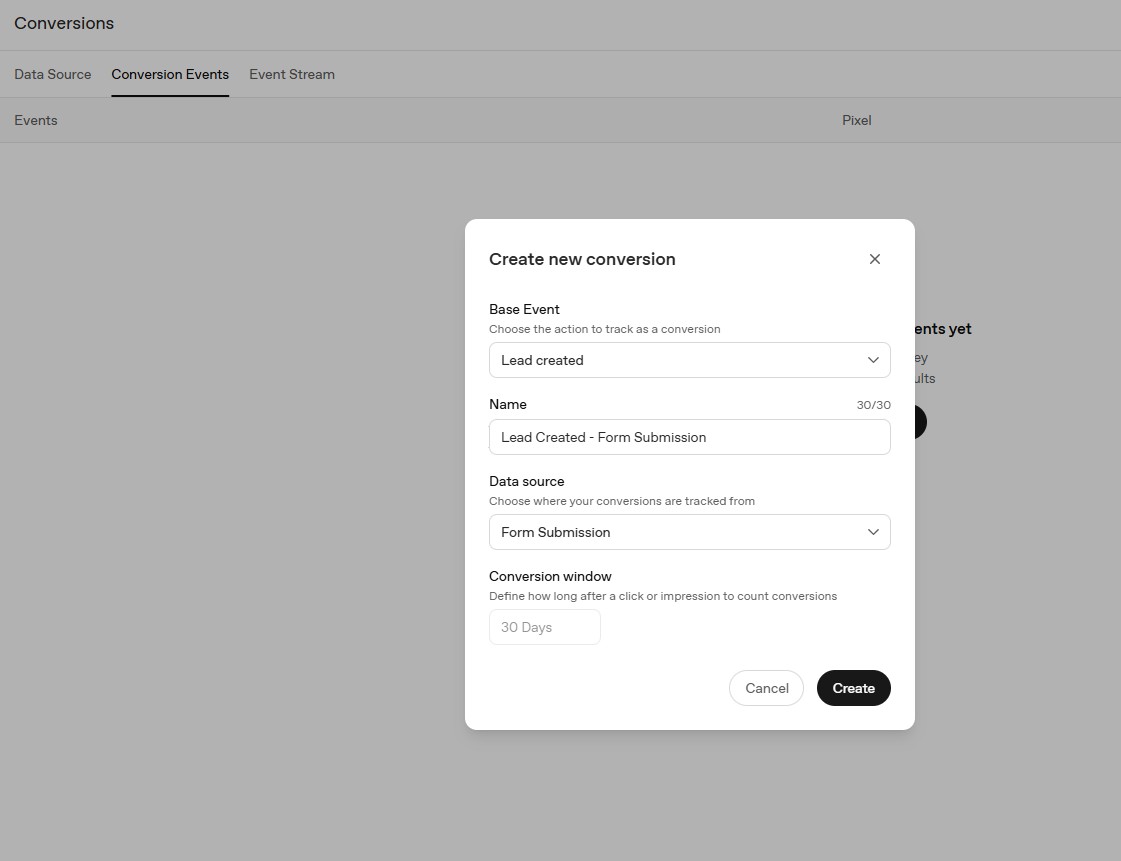
Firing Conversion Events
With the base pixel on all pages, you now fire oaiq("measure", ...) when a meaningful conversion happens — on your thank-you page, order confirmation, or triggered by a button click.
| Argument | Required | Description |
|---|---|---|
eventName | Yes | A standard event name (see Step 6) or "custom". |
eventProps | No | Event data: type, optional amount, currency, and event-specific fields. |
eventOptions | No | event_id for deduplication; custom_event_name for custom events. |
// Fire when a user submits a contact or enquiry form
oaiq("measure", "lead_created", {
  type: "customer_action"
});oaiq("measure", "registration_completed", {
type: "customer_action",
amount: 100,
currency: "CAD"
});oaiq("measure", "appointment_scheduled", {
type: "customer_action",
amount: 5000, // value in cents (5000 = $50.00)
currency: "CAD"
});oaiq("measure", "order_created", {
type: "contents",
amount: 2599,
currency: "CAD",
contents: [{
id: "sku_123",
name: "Starter Bundle",
content_type: "product",
quantity: 1
}]
});All Supported Conversion Events
OpenAI supports a set of standard event names across different business types. Choose the events that match your conversion goals.
oaiq(
  "measure",
  "custom",
  { type: "custom", amount: 12999, currency: "CAD" },
  { custom_event_name: "quote_requested", event_id: "quote_req_123" }
);custom_event_name and event_id must go in the 4th argument (eventOptions), not inside eventProps. Putting them in the wrong object silently breaks event matching in Ads Manager.
Tracking Phone Call Leads from ChatGPT Ads
Phone calls are often the highest-value conversion for service businesses — yet the hardest to attribute. When someone sees your ChatGPT ad, visits your site, and calls your number, how do you prove that call came from ChatGPT? Here are three complementary methods.
📞 Method 1 — Dynamic Number Insertion (DNI)
The most accurate method. You swap your phone number with a unique tracking number assigned to the ChatGPT traffic source. When called, the tracking platform records the source and can fire a conversion back.
- Use a call tracking tool like CallRail, WhatConverts, or CallTrackingMetrics
- Set up a number pool for website visitors (4–10 numbers recommended for accurate attribution)
- Add the DNI JavaScript snippet to your site alongside the ChatGPT pixel
- Visitors arriving from a ChatGPT ad see a unique swapped number — the call is attributed to ChatGPT automatically
🔗 Method 2 — UTM Parameters + Call Tracking
Pass UTM parameters in your ChatGPT ad's destination URL so your call tracking tool reads the source when the visitor lands:
- Set your ad URL to:
https://yoursite.com/?utm_source=chatgpt&utm_medium=cpc&utm_campaign=canada - Your call tracking software reads
utm_source=chatgptfrom the session - Calls from that session are tagged as ChatGPT-sourced in your reports
- Most call tracking platforms store UTM data in session cookies for 30–90 days
🔥 Method 3 — Fire a Pixel Event on Click-to-Call
For mobile users, fire a ChatGPT conversion event when someone taps your phone number. This captures intent without any call tracking tool:
<!-- Phone number link -->
<a href="tel:+16471234567" onclick="trackPhoneClick()">
  📞 Call Us: (647) 123-4567
</a>

<script>
function trackPhoneClick() {
  // Fire to OpenAI Ads Manager
  oaiq("measure", "lead_created", {
    type: "customer_action"
  });
  // Also fire to GA4 (optional but recommended)
  gtag("event", "phone_call_click", {
    event_category: "ChatGPT Lead",
    event_label: "click_to_call"
  });
}
</script>Use all three methods together: DNI for accurate call attribution, UTMs for source labelling in your CRM, and the click-to-call pixel event as a fallback for mobile users. This gives you the most complete picture of your ChatGPT ad ROI from phone leads.
Passing ChatGPT Conversions to Google Analytics GA4
Sending ChatGPT conversions into GA4 gives you a unified view of ROI across your entire media mix — ChatGPT, Google Ads, Meta, and more — all in one report.

Fire both the OpenAI pixel event and a GA4 event simultaneously from the same trigger. You can do this via two GTM tags on the same trigger, or inline on your thank-you page:
// ── Fire to OpenAI Ads Manager ──────────────────────
oaiq("measure", "lead_created", {
  type: "customer_action"
});

// ── Fire to Google Analytics GA4 ────────────────────
gtag("event", "generate_lead", {
  event_category: "ChatGPT Ads",
  event_label: "lead_form_submission",
  value: 1,
  campaign_source: "chatgpt",
  campaign_medium: "cpc"
});
In GA4, mark generate_lead as a conversion under Admin → Events → Mark as conversion. It will then appear in your Conversions report with source attribution for ChatGPT traffic.
In Google Tag Manager, create two separate tags on the same trigger (e.g. "Thank You Page View"): one Custom HTML tag for the OpenAI oaiq() call, and one GA4 Event tag for GA4. This keeps tracking clean and easy to audit.
Deduplication (Browser + Server Events)
If you send the same conversion from both the browser pixel and a server-side integration (e.g. your CRM or backend), OpenAI will count it twice — inflating your conversion numbers — unless you implement deduplication.
The fix: generate a unique event_id for each conversion and pass the same ID in both the browser pixel call and the server-side API call. OpenAI matches on Pixel ID + event name + event_id and discards the duplicate.
// Use your real order or lead ID as the event_id
const orderId = "order_98765";

oaiq(
  "measure",
  "order_created",
  { type: "contents", amount: 2599, currency: "CAD" },
  { event_id: orderId }  // ← same ID sent from your server
);Only if you're also sending conversions via OpenAI's Conversions API (server-side). For most lead generation setups using only the browser pixel on a thank-you page, deduplication is not required — the SDK auto-generates event IDs.
Let Zigma Handle Your
ChatGPT Ad Strategy
Setting up conversion tracking is just the start. Our team builds, manages, and optimizes ChatGPT campaigns for Canadian businesses — with full pixel setup, GA4 integration, and call tracking included.